
News & Information
Membership
Contact Us
Sponsorship
Internet
Cafe
Gallery
People
Project
How to
Links


Shell
There was much discussion about what to make the external body of the car. The eventual decision was to use divinycel laminated with fibreglass for the bulk of the body.
The nosecone is the most important part aerodynamically and it will be built from a plug/mould out of fibreglass. The top half of the nose cone will be attached to the rest of the top of the car including the signs. The bottom half of the nosecone will be attached to the underbody of the car which will remain attached to the remainder of the car.
We constructed a 3DMF drawing of the car shell first - this is a picture of what the car should end up looking like.
There is a three step process for building the nosecone. It is a fairly common fibreglass technique. Many of the teams use this process for building their entire car. Due to the time requirements and the size of the components you end up working on we can't justify the effort for the entire top of the car.
Build your Plug
 |
 |
The first step of the process is to build a life size model of the object you want to make out of fibreglass or carbon fibre, etc. It doesn't matter what you use to construct this model, as long as you end up with a smooth outside surface that is the correct shape.
We chose to build the plug for the nosecone out of MDF, plywood and automotive filler. The technique was provided by Don Elliot who has had a hand in many of the succesful solar cars in Australia.
Our nosecone plug was intended to be 1790mm wide (allowing 10mm manufacturing tolerance to fit within our 1800mm limit). It was 400mm high and 600mm deep from the front of the car. At the end of the day it will probably be 4-5mm wider than initially indended but that should still leave us within the 1800mm limit assuming the rest of the process is completed correctly.
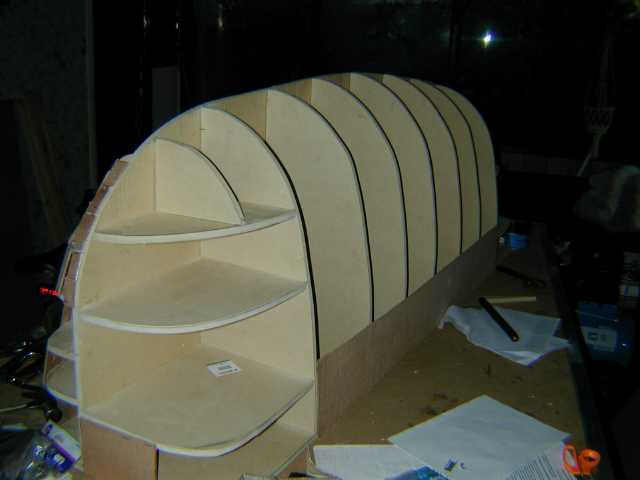
The plug is built by cutting out profiles across the car. These profiles were nailed together to form a skeleton of the finish product. The profiles were made of 10mm MDF and cut to shape by drawing lines on the MDF in pencil and cutting them out using a jigsaw.
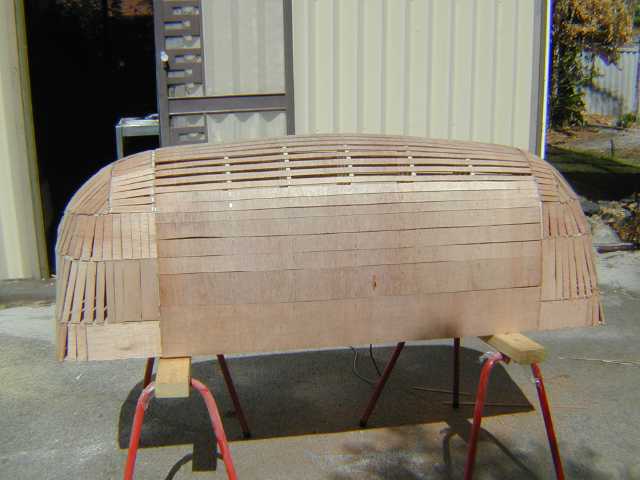
The skeleton is covered in 3mm plywood so that you end up with a flat surface to put the filler onto. Some people use polystyrene foam to fill in the gaps in the surface.
Once the plywood had been stapled on, the entire thing gets a coat of fibreglass to hold it all rigid. This is then left to dry. Once dry the tedious work begins. You must apply automotive filler that is used for filling in car dents and sand it back until you have the correct shape that is smooth all over.
Using plenty of 60-80 grit sandpaper while you are doing the initial shaping is probably fine. Just keep repeating this process until the plug is "the right shape". To help you find dips in the surface one suggestion is to spray the surface with a very thin layer of paint or lacquer. If you run the sander of this, you'll sand off all the peaks and the dips will be apparent. Another tip was to build yourself a 2m long sanding block for long straight surfaces. It will guarantee you don't leave any large scale dips and bumps in the surface.
Once the shape is achieved you must start preparing the surface. This involves sanding the surface with increasingly fine sandpaper. 80, 120, 180, 240, 360, 600, 800, 1200. At the end of this process your surface should be smooth like glass. Coat this surface in 3-4 layers of shellac to seal it. This will probably need to be sanded back again using the last few levels of sandpaper as it tends to set with bumps in it.
Your plug is now finished. This is the point where you've spent a couple of hundred hours on it and we weren't willing to sacrifice it to the gods of fibreglass inexperience. We are handing our plug over to professionals to make the finished product for us. For your benefit the process is described here.
Making the Mould
The plug must be coated to ensure that it comes out of the mould properly. Coat your plug in many layers of mould wax. This should make the surface shiny and also give you a good chance of getting the mould off easily. If you mess up this stage, when you apply the fibreglass to the outside of the plug, you will not be able to get it off and you may damage your plug and/or destroy your mould getting it off. To avoid this you should apply PVA release agent to the plug. This is a poly vinyl alcohol that dries quickly leaving a very thin layer of very unsticky plastic. When you try to pull the mould off it should come off easily. You'll need to wash the PVA release agent off your mould.
Put fibreglass all over your prepared plug and let it dry. You should try and apply the fibreglass down to the flat surface the plug is sitting on and then make a flat surface there. This will give the entrance into the mould more structural rigidity and improve the accuracy of the finished product.
It is probably worth mentioning that your plug must be tapered or it may not come out of the mould. If the plug is bigger than its base, it is not coming out that hole.
Making the finish product.
Any small dents in your plug will manifest themselves as bumps in your mould. You now have one last chance to go and fix that. Clean and polish up your mould just like you did your plug. Apply coats of wax and release agent. Apply fibreglass to the inside of the mould and let it set.
Pull it out of the mould. At this point we are going to cut our nosecone in half. We will then sand one side, wax the other and then put it back into the mould to apply another piece of fibreglass around the middle. This will leave us with a landing pad for the top half to come down over and ensure the two halves register properly against each other when the car is assembled.
Inserting indicators covers is the only other exciting bit. We're planning on using acrylic plastic to mould a piece to the shape of the nose cone and then put another piece inside that when its cooled down. That piece will be cut to size and then moulded into the front section of the car when the finished product is made. We may need to sand it a little afterwards but we'll deal with that if we have to.